Showing posts with label inspiration. Show all posts

Wednesday, 5 January 2022

πŸŽ€πŸŽˆπŸ’–THE BEGINNINGπŸ’–πŸŽˆπŸŽ€


Hello lovelies!
With the chance of my new upcoming solo show with Curio Art Gallery in Portugal, which is themed around Alice in Wonderland, I'll be showing you a bit of my process of how I prepare the work I'll show, so that you can learn sth on the way, whether it is a few technique tricks or the madness of an artist πŸ€ͺπŸ˜‚πŸ’–

So, let's start with the bunny today...! I decided to start working on the messenger bunny as a first piece, and not the white rabbit, because of the colors! This was the ideal theme to warm me up! A solo show carries a lot of weight and responsibility, it really is hard to explain. I personally see it as a challenge to outdo myself, to go further than I have reached until then, always artistically speaking. On a solo show you work together with a gallery and it is an honor for an artist to be picked by a gallery, so like a parent that has invested in you and helped you, you want to make them proud of that choice and the faith they showed in you!! πŸŽ€


The messenger bunny dressed on the gown of hearts, with warm pinks and reds all around, seemed like the perfect mood-fixer to begin with! Warm colors make you feel more vibrant and more optimistic in my opinion, and are more suitable for activity and 'let's do it' mood!


I started out with a first sketch (above). Eyes are not a problem for me, since I started sketching them at the age of 14, so...many years of practice 😜!!

But the bunny in my first sketch looked older, and more serious than I wanted. Big eyes make a figure look young, but the distance between eyes and the chin line is very important to achieve youth: the closer the eyes are to the chin, the younger the figure. It's the same with children if you observe! With a little tweaking on Photoshop, the sketch came to where I wanted, so that was done:


Many times I make a B&W shading sketch, but for this one I needed the color therapy asap, so I painted my initial sketch with gouache. The result is what you see in the first picture. I was quite happy with it (lucky me!) so this one is ready to go on the painting process now πŸ’–πŸ€—!!

We'll let this be for a while and on the next post we'll talk about fur, so if you're an animal lover, don't miss it ❤πŸ˜‰!

Thursday, 3 December 2015

Lollipop Rococo


This is my last painting, 'Lollipop Rococo' and I wanted to share it in bigger analysis with you.

She's the first actual Lowbrow piece that I've painted and it feels kind of awkward. But it certainly has the general feeling of my work on it. 

I hope you like it! 

Sunday, 4 October 2015

Lovely inspiration by Mariska Karto

Is it photograph or is it a painting? Hard to tell.
I love the cotton-smooth skin depicted on Baroque/renaissance paintings and thought it's hard to achieve on acrylics, that's where I'm headed at.
Mariska Karto's work seems a highly-recommended inspiration if realistic painting is where your heart lies, and it's definitely a pleasure for the eye and the soul. Lovely work!!! Here's her website if you're interested for more:http://www.mariska-karto.com/


Saturday, 25 July 2015

WIP by Zelyss: 'Sandybell and skippers'

 Currently working on: 'Sandybell and skippers'

Progress photo

Progress photo 2

...and inspiration photo (+a bunch of others of course...)

Too late to write more now, sleepy-sleepy-tired!

Bye all,
:)

Wednesday, 1 July 2015

Tutorial #3 : Glimpses of my process - FIRST STAGES: Sketching and shading

So I woke up this morning in a foul mood, crazy things are happening these days. Since I'm not at a point of pure happiness, I decided I might give someone else a chance to feel lucky today :)

Jokes (or not) aside, I am sharing below a little bit of my process with you. This is the current painting I'm working on at the moment, it will be titled "Rosemary, the time keeper".

So, let's begin!


1) On gesso primed and sanded board (I have given details of the boards I am using on previous tutorial, see here: BOARDS TUTORIAL), I paint on a greyish background and once it's dry, I transfer the sketch. The initial transfer is by pencil, then I trace it again with a very thin brush dipped on diluted acrylic paint.


2) The next step is establishing values and tones. First come the highlights (with pure, diluted, white) and then the shadows. The process is a little bit like this: 

paint on...


3)
...then smear. 
So that we get that shady effect. The paint must be really thin and you mustn't fear getting your fingers a little dirty. But I don't believe there is any artist who does.


The process of establishing the values is very important, simply because it gives an idea of what the painting will look like, and at this point it is easy to see and correct the mistakes. I used to do this by pencil on the initial sketch as a guide, but I now prefer to do it directly on the painting. It is one of the most fun steps of the way, perhaps the one I enjoy the most! At this stage it is good to take a photo of your masterpiece, to keep it as reference afterwards, because layers of paint will start covering everything pretty soon and you will not remember where is what in the end.

That's all I got for now, but I will keep you updated soon. Have you liked my tutorial so far? Then how about dropping by my facebook page here : FACEBOOK ZELYSS and like my page. 
I like to gain fans the fun way! 

See you on my next post!


Sunday, 21 June 2015

"Alice in the field of butterflies" - wip - sketch by Zelyss

"Alice in the field of butterflies"

Starting new painting, working at the same time on Eve. Photo is poor but camera is not always handy so I am experimenting with anything available.

PS I miss reading :( No time in the last few days (seriously).

Friday, 5 June 2015

Inspiration for new painting...#2


I can see this as a painting, but with her face looking at me instead of her back...

Thursday, 4 June 2015

Tutorial #2: Panel qualities - which wood should you choose?

Hi there! Today I decided to post about types of wood panels/boards to work on. You see I just had a new stack of boards delivered to the studio, ready to prime and paint (yeah!). Here they are below, in several sizes.


So I have had my fair share of several attempts of painting on several surfaces. I have even painted on a red PVC surface (see my painting "Circus Madelein" below).


As I said to my previous tutorial, the key is always proper priming, with several Gesso primer layers and a high dose of patience (for waiting out the layers to dry).

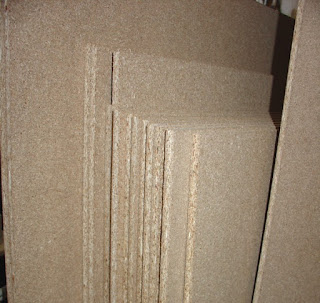
But of course, I do not suggest working on PVC. Stick to wood boards. Now of those, the best and most responsive to my technique is the chipboard, and it is the one below. You can probably find it under other names but this is what it looks like:


This material, with 3 layers of gesso and a little sanding with a fine sandpaper (I use no.400), can be perfect. It does not absorb the color, it has "tooth" for the paint to stay on, it is smooth enough for when you are dry-brushing, but no so smooth to make the paint flow uncontrollably.

Other types of wood boards, which I don't recommend, are the following.

MDF: too satiny, when primed it has a lot of grain raised that will destroy my brushes, and if sanded it again becomes too smooth. 


And last, and worst, plywood. I bought several pieces of plywood with the hope that since it is actual wood, the outcome would be better, but no. As seen in the photos included in my previous tutorial, when the paint goes on, despite priming, the result is risky. Not a chance to be durable.


Never be afraid to experiment, you may find some other surface that works best for you. And never let failed attempts discourage you. There is always a better piece of art waiting ahead, as long as you are there to make it.

Stay tuned for my next tutorial on ways of priming. And if you like my page, drop on my facebook page: https://www.facebook.com/pages/Zelyss/1026378090720993? or my google+ page: https://plus.google.com/116934195623571090402/posts and 'like' /add my page to get more of my news.