Wednesday 29 July 2015

WIP : 'Bat your eyes'#2

And here is the update on the process of 'Bat your eyes':


Step #...7(?): Working on the eyes

Skipped the intermediate steps... Too messy fingers for daring to pick up the camera :)


Monday 27 July 2015

WIP : 'Bat your eyes'

 This is my next project for right after Sandybell. 

These are the stages so far:


Step #1: Enlarge sketch

Step#2: Transfer or board

Step#3: Line with acrylics

Next will be a guideline shading and right after, I can begin coloring!

Saturday 25 July 2015

WIP by Zelyss: 'Sandybell and skippers'

 Currently working on: 'Sandybell and skippers'

Progress photo

Progress photo 2

...and inspiration photo (+a bunch of others of course...)

Too late to write more now, sleepy-sleepy-tired!

Bye all,
:)

Wednesday 22 July 2015

Thank you...!

To all you wonderful people 
who follow-comment-like-view-share my work, 
a great 
'THANK YOU'
by me.

Humbly yours,
Zelyss


Tuesday 21 July 2015

Cheap and Chic : no cost Stay wet acrylics palette


Don't know if you're into crafting, but if you are, you're surely already into using items for multiple purposes. Have you ever tried using an one-use plastic party plate as your palette? Do so. It's the cheapest, lightest palette you can have on your hand. 

The plates come into a variety of sizes and colors, which means you can choose whichever is more convenient for you.


Now as for the staying-wet part. It's not as tricky as you might think. Your best friend here would be a spray bottle filled with clear water. You should use it every now and then (depending on the humidity of your conditions and temperature, the time varies). You will learn from experience how often you need to do it while you're working to keep your paints moist (in general one round-around spraying every 10 minutes should be enough). And after you're done with your painting session, you spray with water once more (if you haven't done so quite recently) and you put the paper plate under another sold plastic plate, tray, whatever you have available, with some weight over it for extra sealing (I use the water jar that I use for cleaning my brushes). Done!


If you will not be using the colors for over a day, just uncover, spray once, then cover again. You're set for another day. I use the same plate palette for the entire painting. It saves money and tears, believe me!

Hope you find this useful, ever since I tried it, it's the only way for me.


Till next time, 

:)
Zelyss


Saturday 18 July 2015

Sneak peek : Rosemary

My girl is about to finish, hopefully by tomorrow (fingers crossed), if only my strained eyes can take it! I really say, and it is not an hyperbole, that the camera can't do justice to the artwork, the feeling is so much warmer when you look at the painting from up close.

If Rosemary were a fairy, or a deity or something, and if I was granted a wish, my wish would be one and only right now: for her to use her magic hourglass and give me more time for painting...

Nice weekend to you all!!


Wednesday 15 July 2015

Sneak peek: "Thessaloniki, the remaining sister"

Sneak peek of my mermaid girl, will be uploading her quite soon. She's turned out lovely and I'm really proud of her. It's one of the very few times that I have nothing to complain about. Actually, thinking about it, I think that's a first. Huh!


Thursday 9 July 2015

A bit of a WIP : Mermaid...

I am in an actual living hell these days, or at least just outside the gates of it. Because things might get worse. Much worse. But I am working, I just don't have time to post.  

Here's a bit of what I'm up to:

A mermaid for a project. This is the first sketch, thought was that it would be underwater, but the hair would not be floating enough and I liked the way it was, so decided not to change it.


This is the mermaid after the sketch transfer, a bit altered. A little more mystical, a little less jolly, sitting on a rock out in the fresh air, a sunset behind her. 


I'm a bit uncertain about the color theme (as usual), I don't want the stereotype colors of a sunset (I really hate orange, too).

I wonder if I could fit teal in this painting as well.....  ;)

Wednesday 1 July 2015

Tutorial #3 : Glimpses of my process - FIRST STAGES: Sketching and shading

So I woke up this morning in a foul mood, crazy things are happening these days. Since I'm not at a point of pure happiness, I decided I might give someone else a chance to feel lucky today :)

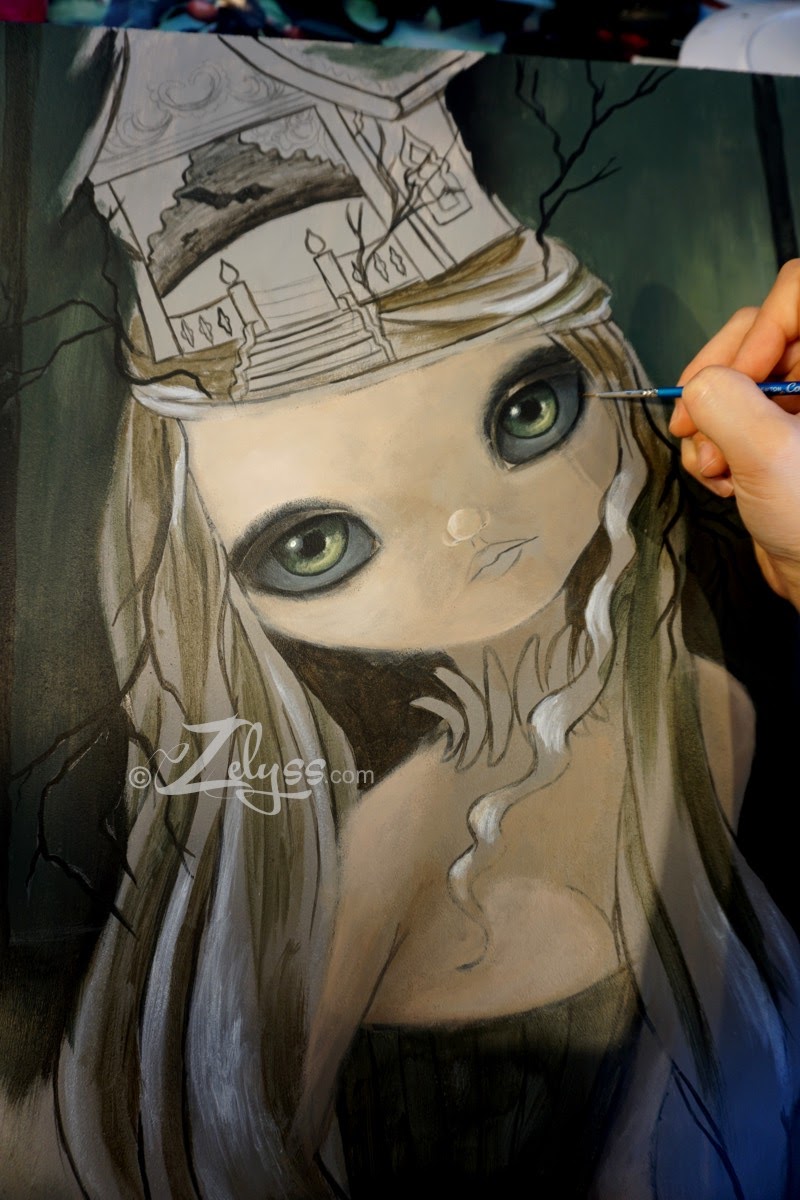
Jokes (or not) aside, I am sharing below a little bit of my process with you. This is the current painting I'm working on at the moment, it will be titled "Rosemary, the time keeper".

So, let's begin!


1) On gesso primed and sanded board (I have given details of the boards I am using on previous tutorial, see here: BOARDS TUTORIAL), I paint on a greyish background and once it's dry, I transfer the sketch. The initial transfer is by pencil, then I trace it again with a very thin brush dipped on diluted acrylic paint.


2) The next step is establishing values and tones. First come the highlights (with pure, diluted, white) and then the shadows. The process is a little bit like this: 

paint on...


3)
...then smear. 
So that we get that shady effect. The paint must be really thin and you mustn't fear getting your fingers a little dirty. But I don't believe there is any artist who does.


The process of establishing the values is very important, simply because it gives an idea of what the painting will look like, and at this point it is easy to see and correct the mistakes. I used to do this by pencil on the initial sketch as a guide, but I now prefer to do it directly on the painting. It is one of the most fun steps of the way, perhaps the one I enjoy the most! At this stage it is good to take a photo of your masterpiece, to keep it as reference afterwards, because layers of paint will start covering everything pretty soon and you will not remember where is what in the end.

That's all I got for now, but I will keep you updated soon. Have you liked my tutorial so far? Then how about dropping by my facebook page here : FACEBOOK ZELYSS and like my page. 
I like to gain fans the fun way! 

See you on my next post!